In this posting, we will learn about interacting with user input.
This kind of thing is very important in web development, so make it yours.
Create a Project
First of all, create a project to use as an example.
2021.06.02 - [Web/JavaScript] - [Vue] Getting Started with Vue3 + TypeScript + TailwindCSS
Basic Input Tag
Now, get a name from the user.
<h2 class="mb-2 text-xl font-medium text-green-600">input</h2>
<input
  v-model="varName"
  placeholder="Input name"
  class="px-2 rounded text-gray-700 outline-none"
/>

<h2 class="mt-8 mb-2 text-xl font-medium text-green-600">Result</h2>
<div class="grid grid-cols-2 gap-x-4 gap-y-2 text-center">
  <div>Name</div>
  <div>{{ varName }}, {{ varName.length }}</div>
</div>
data() {
return {
varName: "",
};
},
You can get user input with v-model directive.
It will automatically update the value every time you type.
Also, even whitespace will be entered.
If you want to automatically remove whitespace, try .trim modifier.
.trim modifier removes the leading and trailing whitespace.
<input
  v-model.trim="varNickname"
  placeholder="Input nickname"
  class="mt-2 px-2 rounded text-gray-700 outline-none"
/>

<div>Nickname</div>
<div>{{ varNickname }}, {{ varNickname.length }}</div>
data() {
return {
varName: "",
varNickname: "",
};
},And, input something with whitespace to test.

Next, let's try to update it only when the input is complete.
.lazy modifier can help this.
The input value will update once press the enter key or click other regions after type.
<input
  type="password"
  v-model.lazy="varPassword"
  placeholder="Input password"
  class="mt-2 px-2 rounded text-gray-700 outline-none"
/>

<div>Password</div>
<div>{{ varPassword }}</div>
data() {
return {
varName: "",
varNickname: "",
varPassword: "",
};
},
Did you check it out?
At last thing, we can change user input to a number automatically.
.number modifier will make this.
<input
  type="number"
  v-model.number="varAge"
  placeholder="Input age"
  class="mt-2 px-2 rounded text-gray-700 outline-none"
/>

<div>Age</div>
<div>{{ varAge }}</div>
data() {
return {
varName: "",
varNickname: "",
varPassword: "",
varAge: 0,
};
},
How easy! I love Vue!!
Checkbox using Input Tag
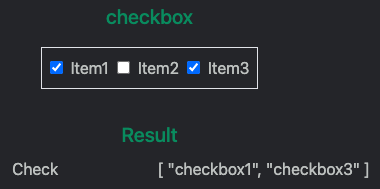
A checkbox is also easy to make.
<h2 class="mb-2 text-xl font-medium text-green-600">checkbox</h2>
<div class="mt-2 border p-2">
  <label class="mr-2"
    ><input
      type="checkbox"
      value="checkbox1"
      v-model="varCheck"
      class="mr-2"
    />Item1</label
  >
  <label class="mr-2"
    ><input
      type="checkbox"
      value="checkbox2"
      v-model="varCheck"
      class="mr-2"
    />Item2</label
  >
  <label
    ><input
      type="checkbox"
      value="checkbox3"
      v-model="varCheck"
      class="mr-2"
    />Item3</label
  >
</div>

<h2 class="mt-8 mb-2 text-xl font-medium text-green-600">Result</h2>
<div class="grid grid-cols-2 gap-x-4 gap-y-2 text-center">
  <div>Check</div>
  <div>{{ varCheck }}</div>
</div>
data() {
return {
varCheck: [],
};
},Create checkboxes and bind them with the same variable in array type through v-model directive.

The array variable contains items chosen.
Radio Button using Input Tag
<h2 class="mt-8 mb-2 text-xl font-medium text-green-600">radio</h2>
<div class="mt-2 border p-2">
  <label class="mr-2"
    ><input
      type="radio"
      value="radio1"
      v-model="varRadio"
      class="mr-2"
    />Item1</label
  >
  <label class="mr-2"
    ><input
      type="radio"
      value="radio2"
      v-model="varRadio"
      class="mr-2"
    />Item2</label
  >
  <label
    ><input
      type="radio"
      value="radio3"
      v-model="varRadio"
      class="mr-2"
    />Item3</label
  >
</div>

<h2 class="mt-8 mb-2 text-xl font-medium text-green-600">Result</h2>
<div class="grid grid-cols-2 gap-x-4 gap-y-2 text-center">
  <div>Radio</div>
  <div>{{ varRadio }}</div>
</div>
data() {
return {
varRadio: "radio1",
};
},It is almost the same as a checkbox.
Create radio buttons and bind them via the same variable.
And the variable has a default value.

Textarea Tag
This is the same as an input tag.
<h2 class="mt-8 mb-2 text-xl font-medium text-green-600">textarea</h2>
<textarea
  v-model="varIntro"
  placeholder="Input your name"
  class="px-2 rounded text-gray-700 outline-none"
/>

<h2 class="mt-8 mb-2 text-xl font-medium text-green-600">Result</h2>
<div class="grid grid-cols-2 gap-x-4 gap-y-2 text-center">
  <div>Introduction</div>
  <div class="whitespace-pre-line">
    {{ varIntro }}<br />Length: {{ varIntro.length }}
  </div>
</div>
data() {
return {
varIntro: "",
};
},

Select Tag
<h2 class="mt-8 mb-2 text-xl font-medium text-green-600">select</h2>
<select v-model="varSelect" class="p-2 rounded text-gray-700 outline-none">
  <option value="" disabled>Select</option>
  <option>Select1</option>
  <option>Select2</option>
  <option>Select3</option>
</select>

<h2 class="mt-8 mb-2 text-xl font-medium text-green-600">Result</h2>
<div class="grid grid-cols-2 gap-x-4 gap-y-2 text-center">
  <div>Select</div>
  <div>{{ varSelect }}</div>
</div>
data() {
return {
varSelect: "",
};
},
You can easily understand it through this example code.
Additional Notes
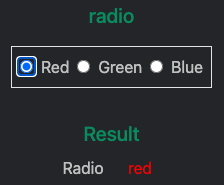
Let me show you the example with both v-bind and v-model.
<h2 class="mb-2 text-xl font-medium text-green-600">radio</h2>
<div class="mt-2 border p-2">
  <label class="mr-2"
    ><input
      type="radio"
      value="red"
      v-model="varRadio"
      class="mr-2"
    />Red</label
  >
  <label class="mr-2"
    ><input
      type="radio"
      value="green"
      v-model="varRadio"
      class="mr-2"
    />Green</label
  >
  <label
    ><input
      type="radio"
      value="blue"
      v-model="varRadio"
      class="mr-2"
    />Blue</label
  >
</div>

<h2 class="mt-8 mb-2 text-xl font-medium text-green-600">Result</h2>
<div class="grid grid-cols-2 gap-x-4 gap-y-2 text-center">
  <div>Radio</div>
  <div v-bind:style="{ color: varRadio }">{{ varRadio }}</div>
</div>
data() {
return {
varRadio: "red",
};
},
'Web > JavaScript' 카테고리의 다른 글
| [Vue3] Conditional Processing using v-if (1) | 2021.06.08 |
|---|---|
| [Vue3] Handling Event using v-on (0) | 2021.06.06 |
| [Vue3] Property Binding using v-bind (0) | 2021.06.06 |
| [Vue3] Variable, Data Types, and Displaying it (0) | 2021.06.04 |
| [Vue3] Getting Started with Vue3 + TypeScript + TailwindCSS (0) | 2021.06.02 |


댓글