customtkinter는 tkinter를 좀 더 modern한 UI로 이쁘게 만들어 줍니다.
간단한 예제와 함께 소개시켜 드릴게요.
Installation
간단하게 pip로 customtkinter만 설치하시면 됩니다.
$ pip install customtkinter
First Example
이제 간단하게 첫 번째 example을 만들어 볼게요.
import customtkinter

class App(customtkinter.CTk):
    def __init__(self):
        super().__init__()

        self.title("minimal example app")
        self.minsize(400, 300)

        self.button = customtkinter.CTkButton(master=self, command=self.button_callback)
        self.button.pack(padx=20, pady=20)

    def button_callback(self):
        print("button pressed")

if __name__ == "__main__":
    app = App()
    app.mainloop()
기존에 tkinter를 사용하셨던 분들은 바로 사용하실 수 있으실 거에요.
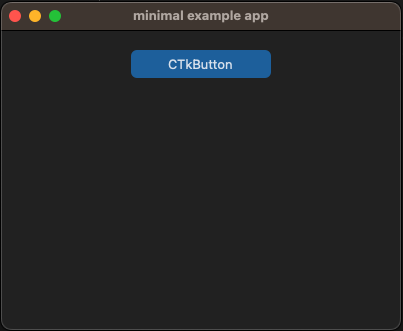
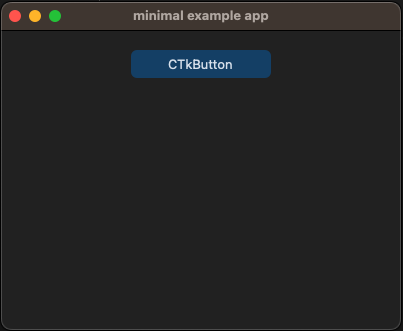
마우스 포인터를 올려보면 hovering도 구현이 되어 있습니다. ㅎㅎㅎ
바로 이렇게 이뻐지니 너무 좋네요.
Change Theme
기본 모드는 dark인데, light혹은 system 설정 내용을 따르게 할 수 있습니다.
또한, 기본 color theme는 blue이지만, dark-blue 혹은 green을 설정할 수 있고요.
customtkinter.set_appearance_mode("light")
customtkinter.set_default_color_theme("green")
코드의 전역 범위에 위와같이 원하는 theme를 명시하시면 됩니다.

당연하게도 원하는 color theme를 직접 만들어 적용할 수도 있는데, json 형태로 만들어 주시면되요.
예시를 링크로 드리니 한 번 살펴보세요.
https://github.com/TomSchimansky/CustomTkinter/wiki/Themes#custom-themes
Decorate Widget
개별 위젯 단위로 색상을 설정할 수도 있습니다.
self.button2 = customtkinter.CTkButton(master=self, command=self.button_callback, fg_color=("orange", "darkorange"), hover_color=("red", "darkred"))
self.button2.pack(padx=20)
색상을 그냥 넣으면 항상 적용이 되고, tuple 형태로 넣으면 앞쪽은 light 모드일 때, 뒤쪽은 dark 모드일 때 적용이 됩니다.


text_color, border_color 등도 같은 형태로 변경하실 수 있어요.
Counter Application
마지막으로 간단한 counter 앱을 하나 만들어 보고 마치겠습니다.
import customtkinter

class App(customtkinter.CTk):
    def __init__(self):
        super().__init__()

        self.title("Counter App")
        self.minsize(400, 300)

        self.counter = 0

        self.label = customtkinter.CTkLabel(self, text="0")
        self.button1 = customtkinter.CTkButton(self, text="-", command=self.decrease)
        self.button2 = customtkinter.CTkButton(self, text="+", command=self.increase)

        self.label.grid(row=0, column=1)
        self.button1.grid(row=0, column=0, padx=10)
        self.button1.configure(width=50)
        self.button2.grid(row=0, column=2, padx=10)
        self.button2.configure(width=50)

        self.grid_rowconfigure(0, weight=1)
        self.grid_columnconfigure(0, weight=1)
        self.grid_columnconfigure(1, weight=1)
        self.grid_columnconfigure(2, weight=1)

    def decrease(self):
        self.counter -= 1
        self.label.configure(text=str(self.counter))

    def increase(self):
        self.counter += 1
        self.label.configure(text=str(self.counter))

if __name__ == "__main__":
    app = App()
    app.mainloop()
기존의 tkinter와 거의 차이가 없죠? CTk 접두사가 붙거나 config 대신 configure를 사용하거나 하는 정도의 차이만 있습니다.

하지만 결과물 차이는 매우 큽니다. ^^
'Python' 카테고리의 다른 글
| [Python] Enumeration (0) | 2023.02.21 |
|---|---|
| [Python] Data Classes (0) | 2023.02.20 |
| [PyQt6] GroupBox, CheckBox, RadioButton in QML (0) | 2022.11.21 |
| [PyQt6] Dialogs in QML (1) | 2022.11.20 |
| [PyQt6] User Input in QML (0) | 2022.11.19 |


댓글