ResNet에서는 Residual Block이라는 구조를 사용하여 복잡한 특징을 추출합니다.
Residual Block

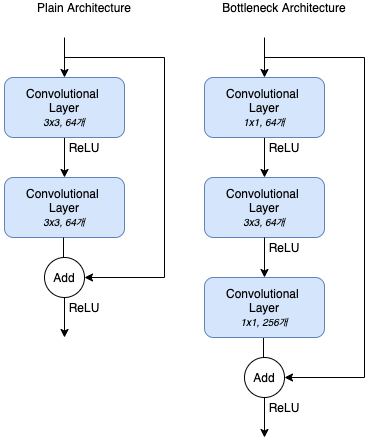
Convolutional Block은 보통 위와 같은 구조를 갖습니다.

반면 Residual Block은 위와 같이 우회 경로가 추가됩니다.
Convolutional Layer에서 학습이 필요하지 않은 부분은 이 Shortcut Connection(우회경로)을 통해 전달이 되어 더 깊은 레이어를 쌓아서 학습을 시킬 수 있습니다.
결과적으로 더 좋은 성능을 끌어낼 수 있는 것입니다.

Residual Block에는 그림에서 보듯이 Plain Architecture와 Bottleneck Architecture라는 2개의 구조가 있습니다.
숫자는 논문에서 언급된 최소 사이즈이며, 당연히 더 많은 개수의 커널을 사용할 수 있죠.
Deep Residual Learning for Image Recognition
Deeper neural networks are more difficult to train. We present a residual learning framework to ease the training of networks that are substantially deeper than those used previously. We explicitly reformulate the layers as learning residual functions with
arxiv.org
Identity Mappings in Deep Residual Networks
Deep residual networks have emerged as a family of extremely deep architectures showing compelling accuracy and nice convergence behaviors. In this paper, we analyze the propagation formulations behind the residual building blocks, which suggest that the f
arxiv.org
Input Dataset
2020/11/15 - [DeepLearning] - Image Classification with CNN (Feat. CIFAR-10 and Keras)
이전 포스팅을 참고해서 데이터세트를 준비합니다.
from keras.preprocessing.image import ImageDataGenerator
from keras.utils import to_categorical

train_gen = ImageDataGenerator(featurewise_center=True, featurewise_std_normalization=True, width_shift_range=0.125, height_shift_range=0.125, horizontal_flip=True)
test_gen = ImageDataGenerator(featurewise_center=True, featurewise_std_normalization=True)
for data in (train_gen, test_gen):
    data.fit(train_images)

train_labels = to_categorical(train_labels, 10)
test_labels = to_categorical(test_labels, 10)ImageDataGenerator를 사용하여 정규화를 해주고, 학습 데이터를 늘려주도록 하겠습니다.
딥러닝의 성능을 위해서는 많은 학습 데이터가 영향을 주기 때문에 이러한 방법을 사용합니다.
예전처럼 직접 코딩을 하지 않아도 케라스에서 제공을 해줍니다.
featurewise_center는 각 이미지의 평균에서 전체 이미지의 평균을 빼주어, 분포의 평균을 0에 가깝게 정규화를 시켜줍니다.
featurewise_std_normalization은 평균이 0, 분산이 1인 정규 분포를 따르도록 정규화 시켜줍니다.
width_shift_range와 height_shift_range는 좌우, 상하로 이미지를 이동시켜 학습 데이터를 늘려줍니다.
horizontal_flip은 이미지를 수평으로 반전시켜 학습 데이터를 늘려줍니다.
레이블은 원-핫 인코딩을 해줍니다.
Model
Generating Model
케라스에서 제공하는 Sequential 메소드는 한 줄로 레이어를 연결시켜준다.
따라서, 우리가 현재 만들고자 하는 Shorcut Connection을 만들 수가 없습니다.
먼저, Convolutional Layer를 만듭니다.
from keras.layers import Conv2D
from keras.regularizers import l2

def conv(filter, kernel_size, strides=1):
return Conv2D(filters, kernel_size, strides=strides, padding='same', use_bias=False, kernal_initializer='he_normal', kernel_regualrizer=l2(0.0001))filters는 필터의 개수를 의미합니다.
kernel_size와 strides는 이전 포스팅을 참고하시면 될 것 같습니다.
padding을 same으로 하면 패딩을 붙여 입력과 결과의 크기가 같도록 해줍니다.
입력을 그대로 사용하여 출력의 크기를 줄이고 싶다면 valid를 사용하면 됩니다.
use_bias는 바이어스를 추가할 지 여부를 뜻합니다.
kernel_initializer는 커널의 초기값을 정할 방법을 명시합니다. he_normal은 정규 분포를 사용한다는 뜻입니다.
kernel_regularizer는 kernel의 가중치에 적용할 정규화 방법을 명시합니다.
정규화는 표준화(Normalization)와는 다른 것입니다.
모델을 복잡하게 만드는 가중치에 가중치의 크기만큼 패널티를 부여해서 모델이 복잡해지지 않도록 하는 것입니다.
l1 정규화는 극단적인 가중치를 0으로 만들고, l2 정규화는 극단적인 가중치를 0에 가깝에 만듭니다.
다음으로, Residual Block을 만듭니다.
from keras.layers import BatchNormalization, Activation, Add

def residual_block_a(filters, strides):
    def f(x):
        x = BatchNormalization()(x)
        b = Activation('relu')(x)

        x = conv(filters // 4 , 1, strides)(b)
        x = BatchNormalization()(x)
        x = Activation('relu')(x)

        x = conv(filters // 4, 3)(x)
        x = BatchNormalization()(x)
        x = Activation('relu')(x)

        x = conv(filters, 1)(x)

        sc = conv(filters, 1, strides)(b)

        return Add()([x, sc])
    return f

def residual_block_b(filters):
    def f(x):
        sc = x

        x = BatchNormalization()(x)
        x = Activation('relu')(x)

        x = conv(filters // 4, 1)(x)
        x = BatchNormalization()(x)
        x = Activation('relu')(x)

        x = conv(filters // 4, 3)(x)
        x = BatchNormalization()(x)
        x = Activation('relu')(x)

        x = conv(filters, 1)(x)

        return Add()([x, sc])
    return f

def residual_block(filters, strides, unit_size):
    def f(x):
        x = residual_block_a(filters, strides)(x)
        for i in range(unit_size - 1):
            x = residual_block_b(filters)(x)
        return x
    return f
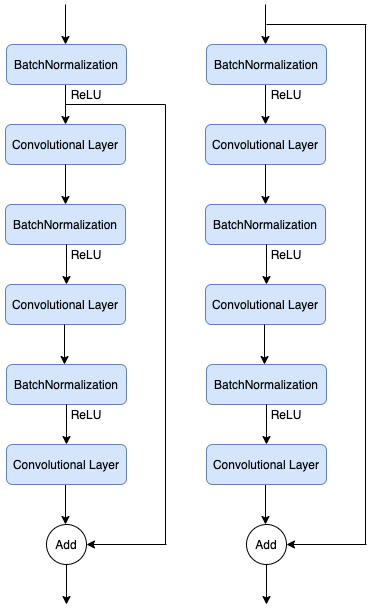
2종류의 Residual Block을 만들어 A타입을 시작으로 B타입을 이어주었습니다.

왼쪽이 A타입, 오른쪽이 B타입으로 Shortcut Connection의 시작 위치만 다릅니다.
BatchNormalization은 학습 속도를 높이는 방법 중 하나입니다.
이 외에도 학습을 할 때마다 출력을 정듀화 하기 때문에 가중치 초기값에 대한 의존성이 적어지고, 드롭아웃을 대체하여 과적합을
방지할 수 있고, 기울기 소실(Gradient Vanishing) 문제도 완화되는 효과를 가진다고 알려져 있습니다.
이제 이 블록들을 갖고 모델을 구성해 봅시다.
from keras.models import Model
from keras.layers import Input, Dense, GlobalAveragePooling2D

# Model
## Input
input = Input(shape=(32, 32, 3))

## Extracting Feature
x = conv(16, 3)(input)
x = residual_block(64, 1, 18)(x)
x = residual_block(128, 2, 18)(x)
x = residual_block(256, 2, 18)(x)
x = BatchNormalization()(x)
x = Activation('relu')(x)
x = GlobalAveragePooling2D()(x)

## Classifying
output = Dense(10, activation='softmax', kernel_regularizer=l2(0.0001))(x)

model = Model(inputs=input, outputs=output)GlobalAveragePooling2D는 평균 값을 사용한 pooling을 하고, 출력을 flatten시켜 내보냅니다.
Compiling Model
모델의 컴파일은 다른 모델과 다를 바 없습니다.
from keras.optimizers import SGD

model.compile(loss='categorical_crossentropy', optimizer=SGD(momentum=0.9), metrics=['acc'])
Training
학습의 효과를 높이기 위해 학습이 진행되면서 안정화가 되어 갈수록 학습률을 낮추어 보도록 하겠습니다.
def step_scheduler(epoch):
    x = 0.1
    if epoch >= 80: x = 0.01
    if epoch >= 120: x = 0.001
    return x

lr_scheduler = LearningRateScheduler(step_scheduler)
epoch이 진행될수록 학습률을 1/10로 줄여나가고 이를 LearningRateScheduler에 넣어줍니다.
history = model.fit_generator(train_gen.flow(train_images, train_labels, batch_size=128), epochs=150, steps_per_epoch=train_images.shape[0] // 128, validation_data=test_gen.flow(test_images, test_labels, batch_size=128), validation_steps=test_images.shape[0] // 128, callbacks=[lr_scheduler])시간이 정말 어마무시하게 걸립니다... Google Colab에서 GPU를 사용해도 반나절은 도네요... 200 epoch 까지 돌리고 싶은데 불가능할
정도로 ㅠ
HW 사양이 충분하시거나 시간여유가 충분하신 분들만 돌려보실 수 있을 거 같아요 ㅠ
전 HW 사양이 별로라... 유료 클라우드를 써야하나 싶네요 ㅎㅎ
아무튼! 지긋지긋할 정도로 오래걸리니 모델은 꼭 저장해두시고 쓰세용.
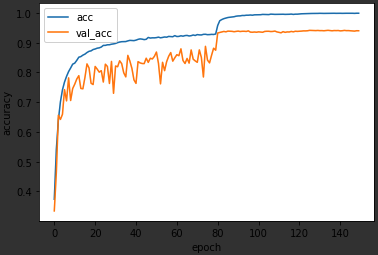
드디어 결과가 나왔네요 ㅠ
plt.plot(history.history['acc'], label='acc')
plt.plot(history.history['val_acc'], label='val_acc')
plt.ylabel('accuracy')
plt.xlabel('epoch')
plt.legend(loc='best')
plt.show()
80 epoch 쯔음에서 급격히 좋아지고 더이상 크게 개선되지는 않네요.
그래도 이전의 일반 CNN 보다는 성능이 확연히 좋아졌죠? 시간은 훠~~얼씬 오래걸렸지만...
Evaluation
test_loss, test_acc = model.evaluate_generator(test_gen.flow(test_images, test_labels, batch_size=128), steps=10)
print('loss: {:.4f}\nacc: {:.4f}'.format(test_loss, test_acc))
# loss: 0.5156
# acc: 0.9344
꽤 높은 정확도를 보이네요.
괜히 유명한 모델이 아니군요. ㅎㅎㅎ
Prediction
test_predictions = model.predict_generator(test_gen.flow(test_images[:5], shuffle=False, batch_size=1), steps=10)
test_predictions = np.argmax(test_predictions, axis=1)
labels = ['airplane', 'automobile', 'bird', 'cat', 'deer', 'dog', 'frog', 'horse', 'ship', 'truck']

for i in range(5):
    plt.subplot(2, 5, i + 1)
    plt.imshow(test_images[i])
    print([labels[test_predictions[i]]], end=", ")
plt.show()
처음 5개의 이미지에 대한 예측은 CNN과 차이가 없군요 ㅋ
이 내용이 다른 모델들 공부하시는 데, 기본기가 될 수 있으면 좋겠습니다. ^^
'AI' 카테고리의 다른 글
| [DL] Save and Load model on Keras (2) | 2021.04.05 |
|---|---|
| [DL] SimpleRNN with Keras (0) | 2020.12.05 |
| [DL] Image Classification using CNN with CIFAR-10 Dataset on Keras (0) | 2020.11.15 |
| [DL] Regression about Boston House Prices with Keras (0) | 2020.11.14 |
| [DL] Classifying Handwriting with Keras (0) | 2020.11.10 |


댓글